使用Cloudflare Workers和Hugo快速部署静态站点
目录
Cloudflare推荐使用Workers替代Pages来部署静态站点,以下为一次完整使用Cloudflare Workers和Hugo快速部署静态站点的实例。
github操作 #
在github上新建项目,属性可以设为私有,防止公共浏览。

然后将项目clone下来
$ git clone git@github.com:xtod/cf1027.git
Cloning into 'cf1027'...
remote: Enumerating objects: 3, done.
remote: Counting objects: 100% (3/3), done.
remote: Total 3 (delta 0), reused 0 (delta 0), pack-reused 0 (from 0)
Receiving objects: 100% (3/3), done.
安装Hugo #
Hugo官方下载链接https://github.com/gohugoio/hugo/releases,根据自己系统进行下载安装。
如果github不能访问,国内下载地址如下:
- Windows版 hugo_extended_withdeploy_0.152.2_windows-amd64.zip (访问密码: 3705)
- Linux版 hugo_extended_withdeploy_0.152.2_Linux-64bit.tar.gz (访问密码: 3705)
然后使用Hugo新建站点
#进入github目录
$ cd cf1027/
#新建站点p
$ hugo new site p
Congratulations! Your new Hugo site was created in D:\githubs\cf1027\p.

Just a few more steps...

1. Change the current directory to D:\githubs\cf1027\p.
2. Create or install a theme:
   - Create a new theme with the command "hugo new theme <THEMENAME>"
   - Or, install a theme from https://themes.gohugo.io/
3. Edit hugo.toml, setting the "theme" property to the theme name.
4. Create new content with the command "hugo new content <SECTIONNAME>\<FILENAME>.<FORMAT>".
5. Start the embedded web server with the command "hugo server --buildDrafts".

See documentation at https://gohugo.io/.
#将文件移动至根目录
$ mv p/* .
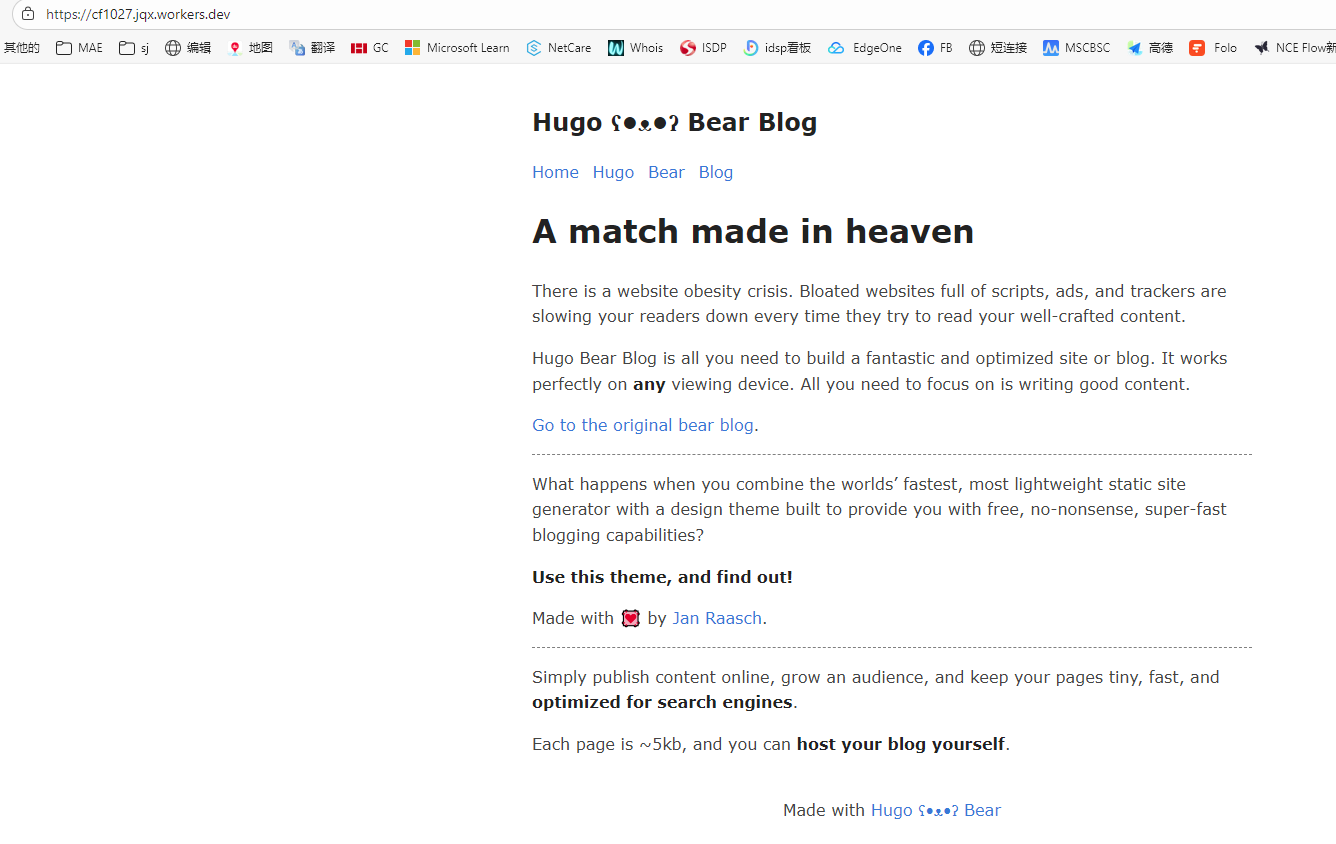
然后浏览hugo主题页面https://themes.gohugo.io/下载主题进行安装,以hugo-bearblog为例
在https://github.com/janraasch/hugo-bearblog下载hugo-bearblog-master.zip文件,将其解压到\cf1027\themes\hugo-bearblog文件夹,目录结构如下:
D:\githubs\cf1027\themes\hugo-bearblog>
├─archetypes
├─exampleSite
│  ├─content
│  │  └─blog
│  └─static
│      └─images
├─images
└─layouts
    ├─partials
    └─_default
将\cf1027\themes\hugo-bearblog\exampleSite目录下所有内容拷贝至项目根目录中\cf1027,替换hugo.toml中baseURL为自己的域名保存即可。
然后使用hugo server进行预览,浏览器访问http://localhost:1313/即可查看效果,Ctrl+C结束预览。
$ hugo server
Watching for changes in D:\githubs\cf1027\{archetypes,assets,content,data,i18n,layouts,static,themes}
Watching for config changes in D:\githubs\cf1027\hugo.toml
Start building sites …
hugo v0.151.0-c70ab27ceb841fc9404eab5d2c985ff7595034b7+extended+withdeploy windows/amd64 BuildDate=2025-10
-02T13:30:36Z VendorInfo=gohugoio

WARN  Raw HTML omitted while rendering "D:/githubs/cf1027/content/blog/markdown-syntax.md"; see https://go
hugo.io/getting-started/configuration-markup/#rendererunsafe
You can suppress this warning by adding the following to your site configuration:
ignoreLogs = ['warning-goldmark-raw-html']

                  │ EN
─────────┼──
 Pages            │ 14
 Paginator pages  │  0
 Non-page files   │  0
 Static files     │  3
 Processed images │  0
 Aliases          │  0
 Cleaned          │  0

Built in 50 ms
Environment: "development"
Serving pages from disk
Running in Fast Render Mode. For full rebuilds on change: hugo server --disableFastRender
Web Server is available at http://localhost:1313/ (bind address 127.0.0.1)
Press Ctrl+C to stop
push所有修改到github
rm -rf resources/ public/ .hugo_build.lock
git add .
git commit -m "update"
git push
Cloudflare Workers新建应用 #
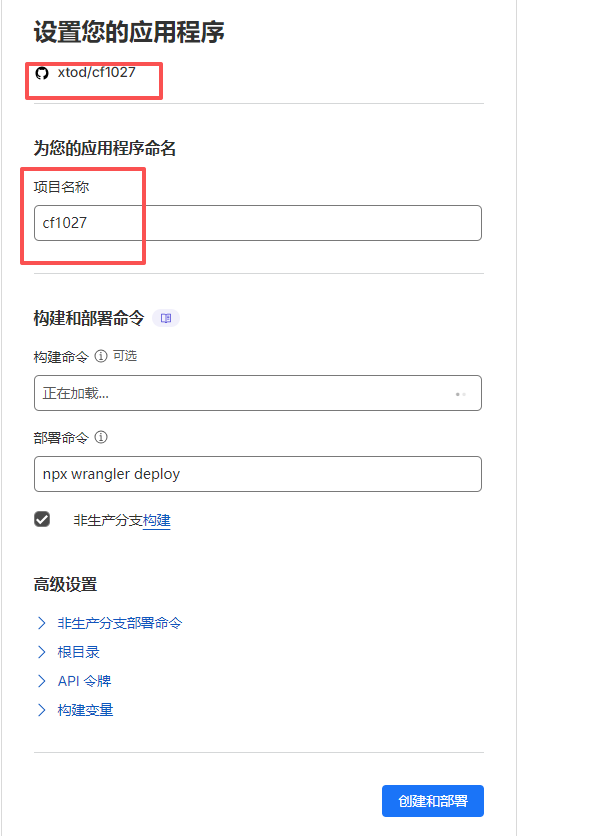
进入到Cloudflare Workers新建应用程序,选择导入存储库,然后选择github平台进行账户鉴权,完了选择名下的cf1027库,如下设置:
然后点击部署,第一次回部署失败,不用理会,进入到github仓库cf1027目录,新建wrangler.jsonc文件,内容如下:
{
  "name": "cf1027",
  "compatibility_date": "2025-10-27",
  "assets": {
    "directory": "./public",
    "html_handling": "auto-trailing-slash",
    "not_found_handling": "404-page",
    "run_worker_first": false
  },
  "build": {
    "command": "hugo build --gc --minify"
  },
  "workers_dev": true,
  "preview_urls": true,
  "observability": {
    "enabled": false,
    "head_sampling_rate": 1,
    "logs": {
      "enabled": true,
      "head_sampling_rate": 1,
      "persist": true,
      "invocation_logs": true
    }
  }
}
保存后重新push到github,即可触发Cloudflare Workers部署,访问域名可以在Cloudflare Workers设置下的域和路由中查看,同样可以在这里设置添加自定义域名。